Part 4 of my current series, All Choked Up, is not happening this week: I’ve hit a bit of a snag, you see. I have completely lost all the lovely red beads I bought back in Part 2. My house is generally upside-down anyway, so I’ve pretty much been left with no choice but to turn it right-side up in looking for them.
I don’t know how they could’ve gone missing: they are (mostly) bright, red, beads, in a padded white envelope.
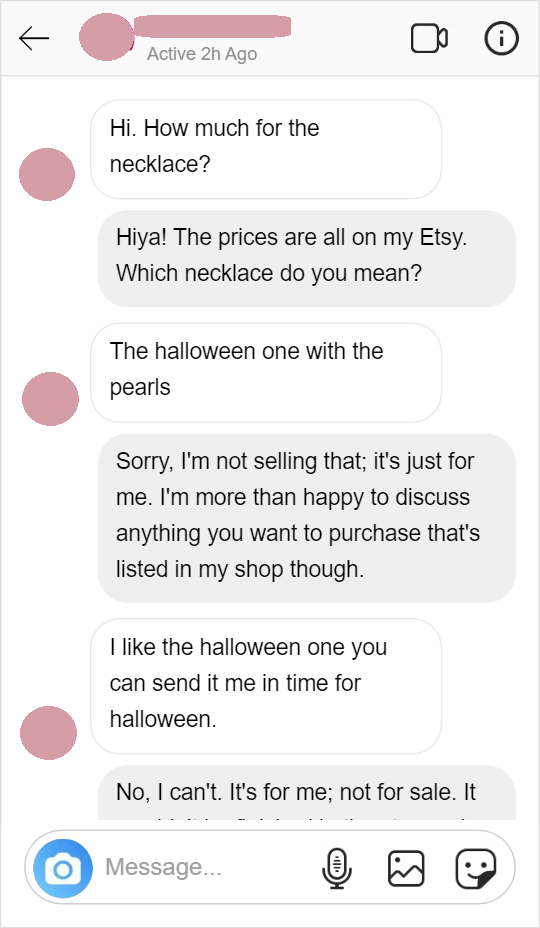
Because I don’t want to miss a week and just not post until I have something to update, I was debating with myself as to whether I should talk about a message I received from someone who wanted to take my necklace away from me. I’ll give you 3 seconds to see if you can guess which side of this internal argument won.
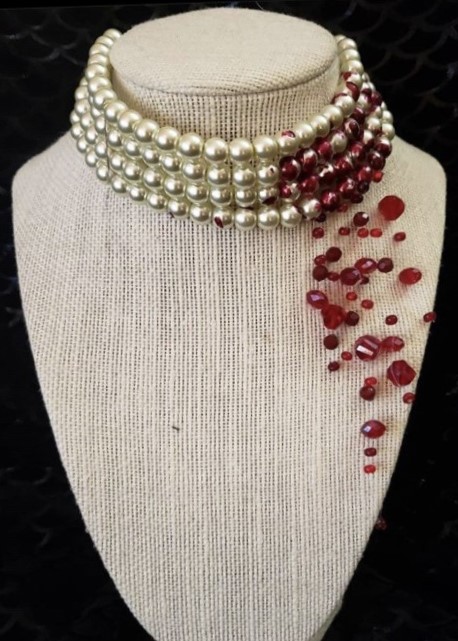
You might remember that, at the end of Part 3 I was saying that I like the choker how it is, and maybe that jinxed it for me? Maybe it’s supposed to be unfinished? Because apparently, it’s not just me who likes it in its current, unembellished state:
I didn’t respond to their last message, even after posting this. But I was curious, so I did go to their profile, and saw that they do indeed have more than 2,500 followers. And 10 posts, all seemingly unrelated. Posts that have no comments and about 30 likes, tops. Suspish, right?
I had some questions: Who are they? How did they find me? Do they also read my blog? Why did they want an unfinished piece?
Ultimately, it’s pretty whatever. I left their message unresponded-to, and blocked them. They didn’t follow me anyway, which I am glad about. But yeah, I’m not entirely sure why they wanted to try their luck with me. Maybe they just saw my follower count was lower than theirs and thought they could use that to their advantage?
I think it threw me off so much because this hasn’t really happened to me before. If I get a DM, it’s about 10% someone asking me to be a “brand ambassador” for them, and most of the rest will be about which of the jewellery pieces in my shop are made with semi-precious stones. Hint: if it’s in my shop and involves solid sterling silver, it’s semi-precious. Anyway, I get to keep my necklace, so that’s all I really care about.
So yeah, that’s as eventful as my week has been: the loss of tens of pounds (sterling, not weight) of red beads, and an annoying string of messages on Instagram from an entitled someone or other. Hopefully I’ll be back on track by this time next week; Hallowe’en is just over a week away, and it’s half term now, so it definitely going to get very busy here very quickly!
That’s all for now. Thanks so much for popping in and having a read. Have a lovely rest of your day!
There’s more to come as this project develops, and while I work out a more consistent schedule for this blog, so please subscribe if you don’t want to miss future posts. And of course, if you have any ideas about what that DM situation was all… about, your comments and thoughts on that will be muchly appreciated.
If you’d like to see more from me, you can find me on Instagram (where you’ll find me most of the time), Twitter, and Facebook, and of course, you cantreat yourself and visit my Shop!
If you’ve not read Parts 1 and 2 yet, you can find them here and here. But if you’d prefer a TL;DR synopsis, then:
I saw an image of a choker I wanted online, but after seeing the price and how long it’d take to get here, I decided to make my own.
After a couple of false starts, I made good progress on making the choker and found out that it fits just how I wanted/expected!
I also threw in a quick story of the first time I saw a ghost. So far it’s been my only sighting. As far as I’m aware, anyway.
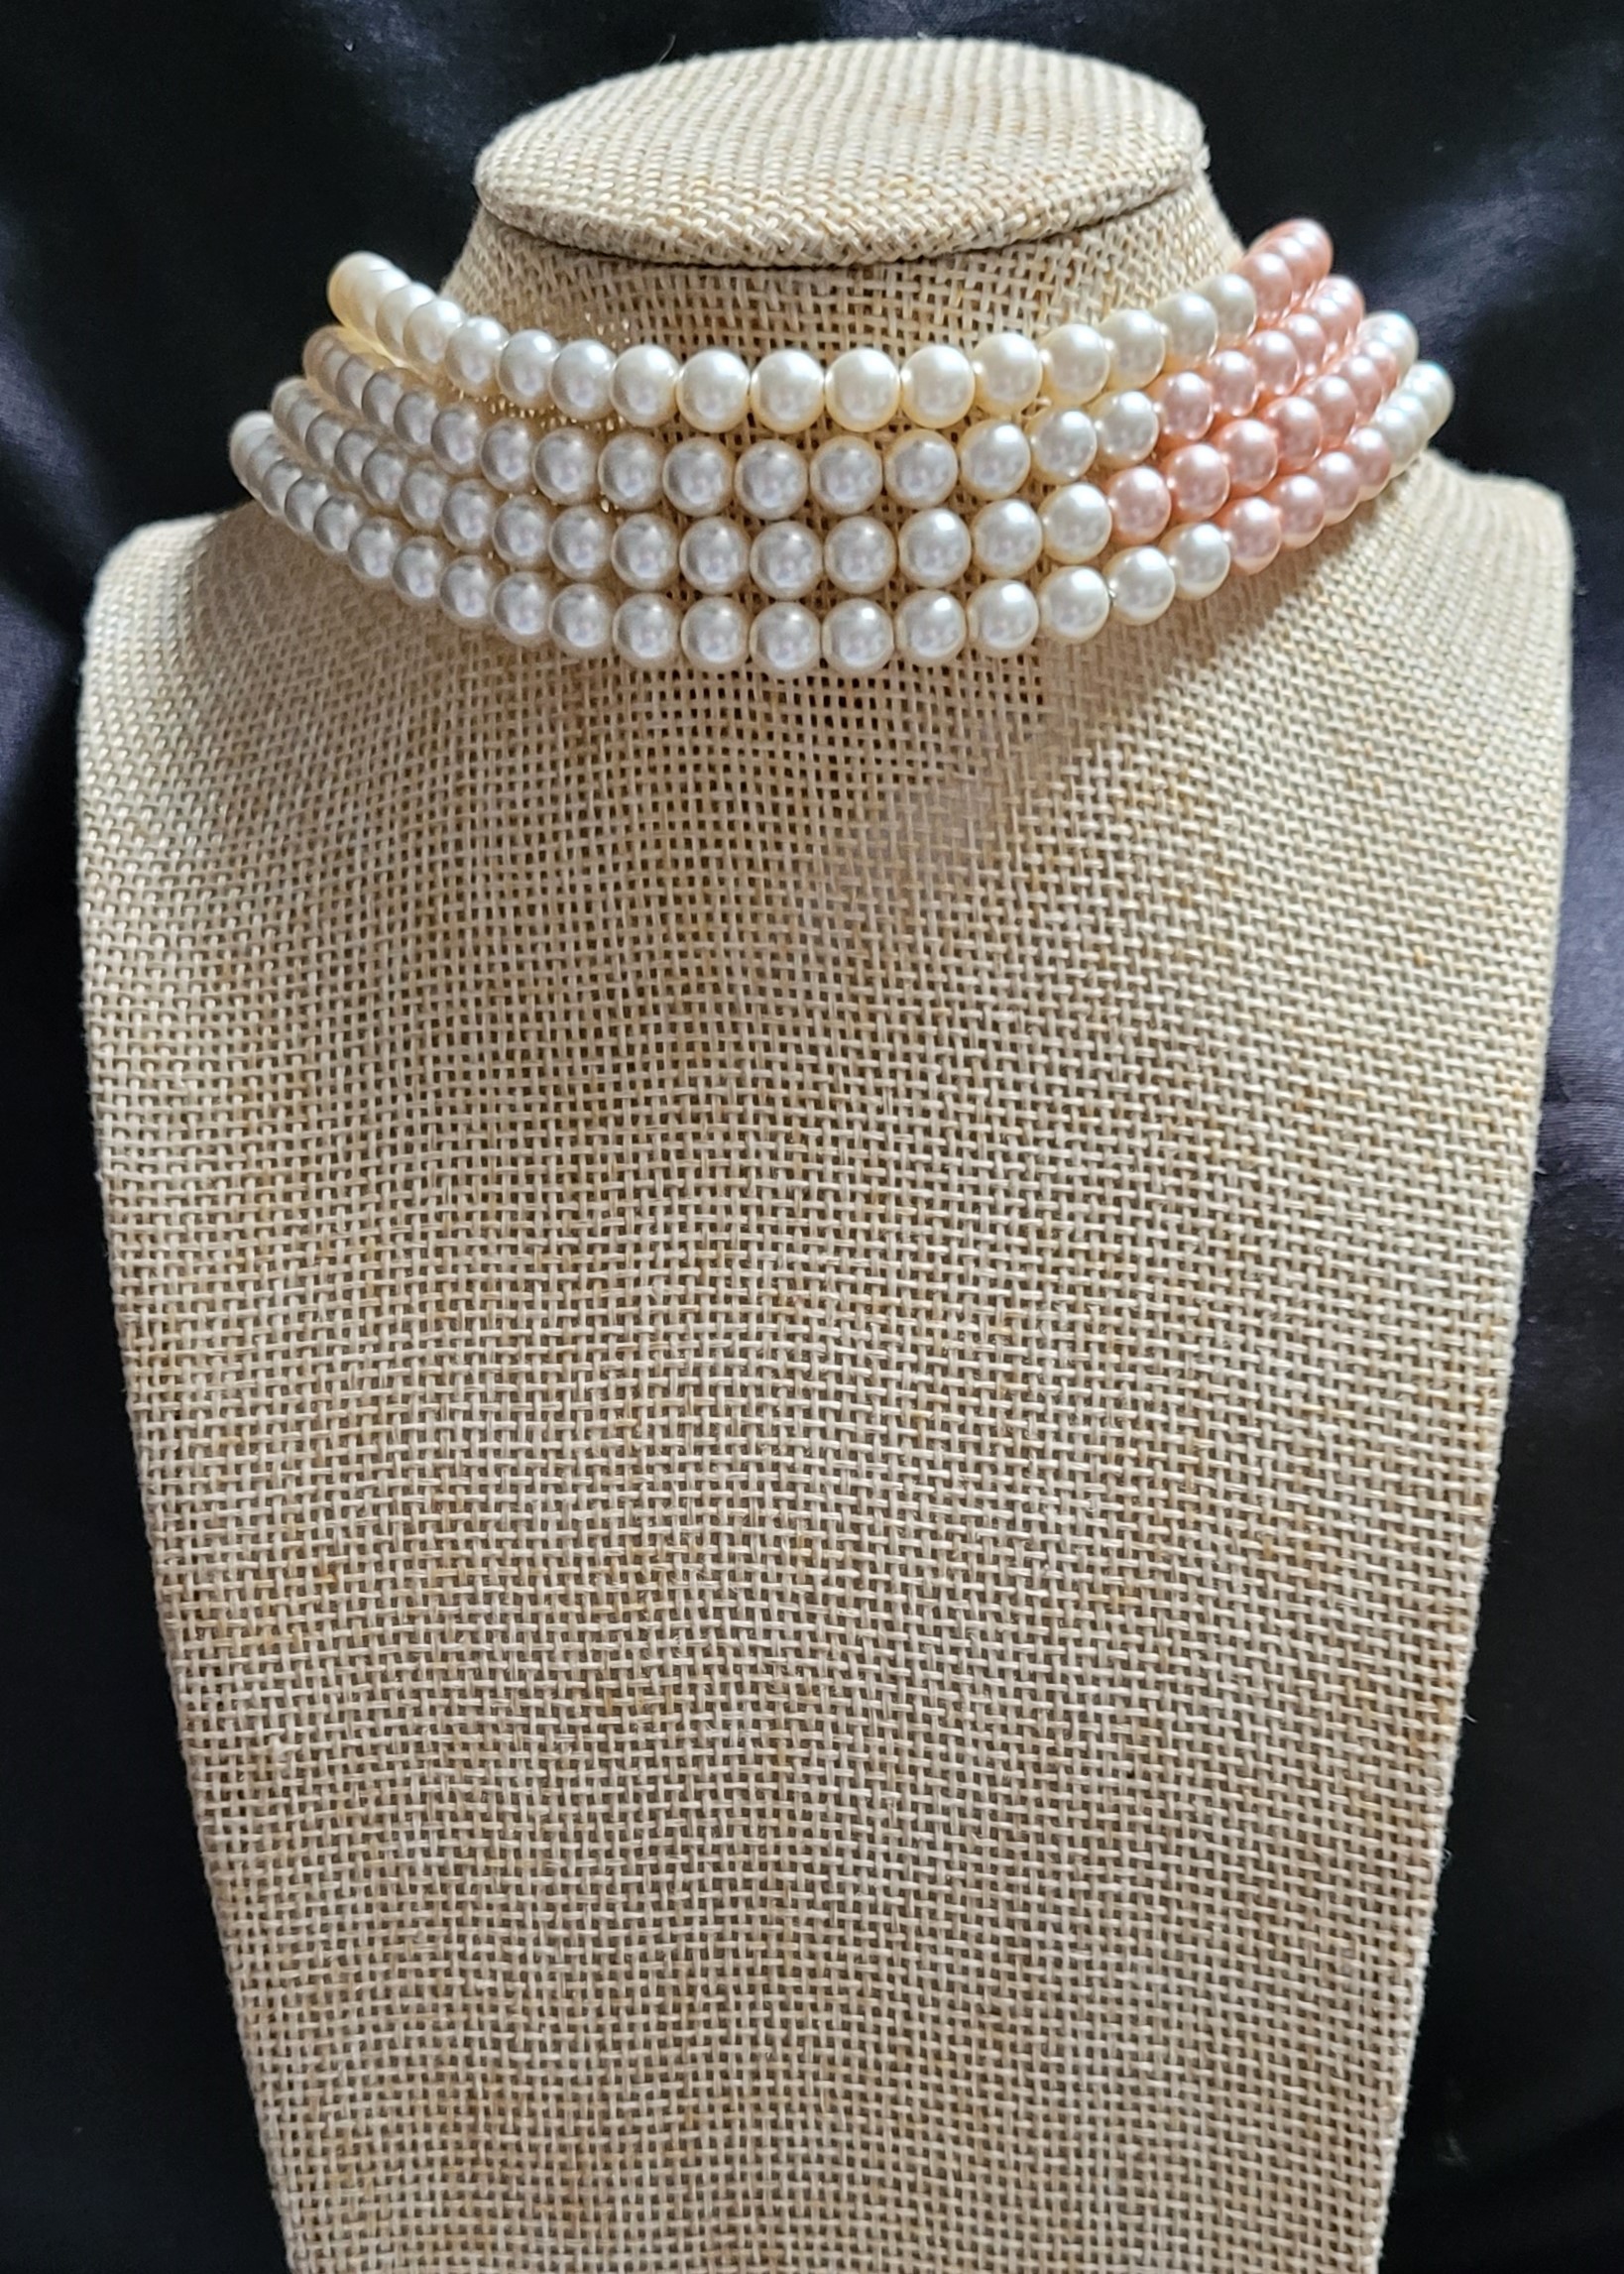
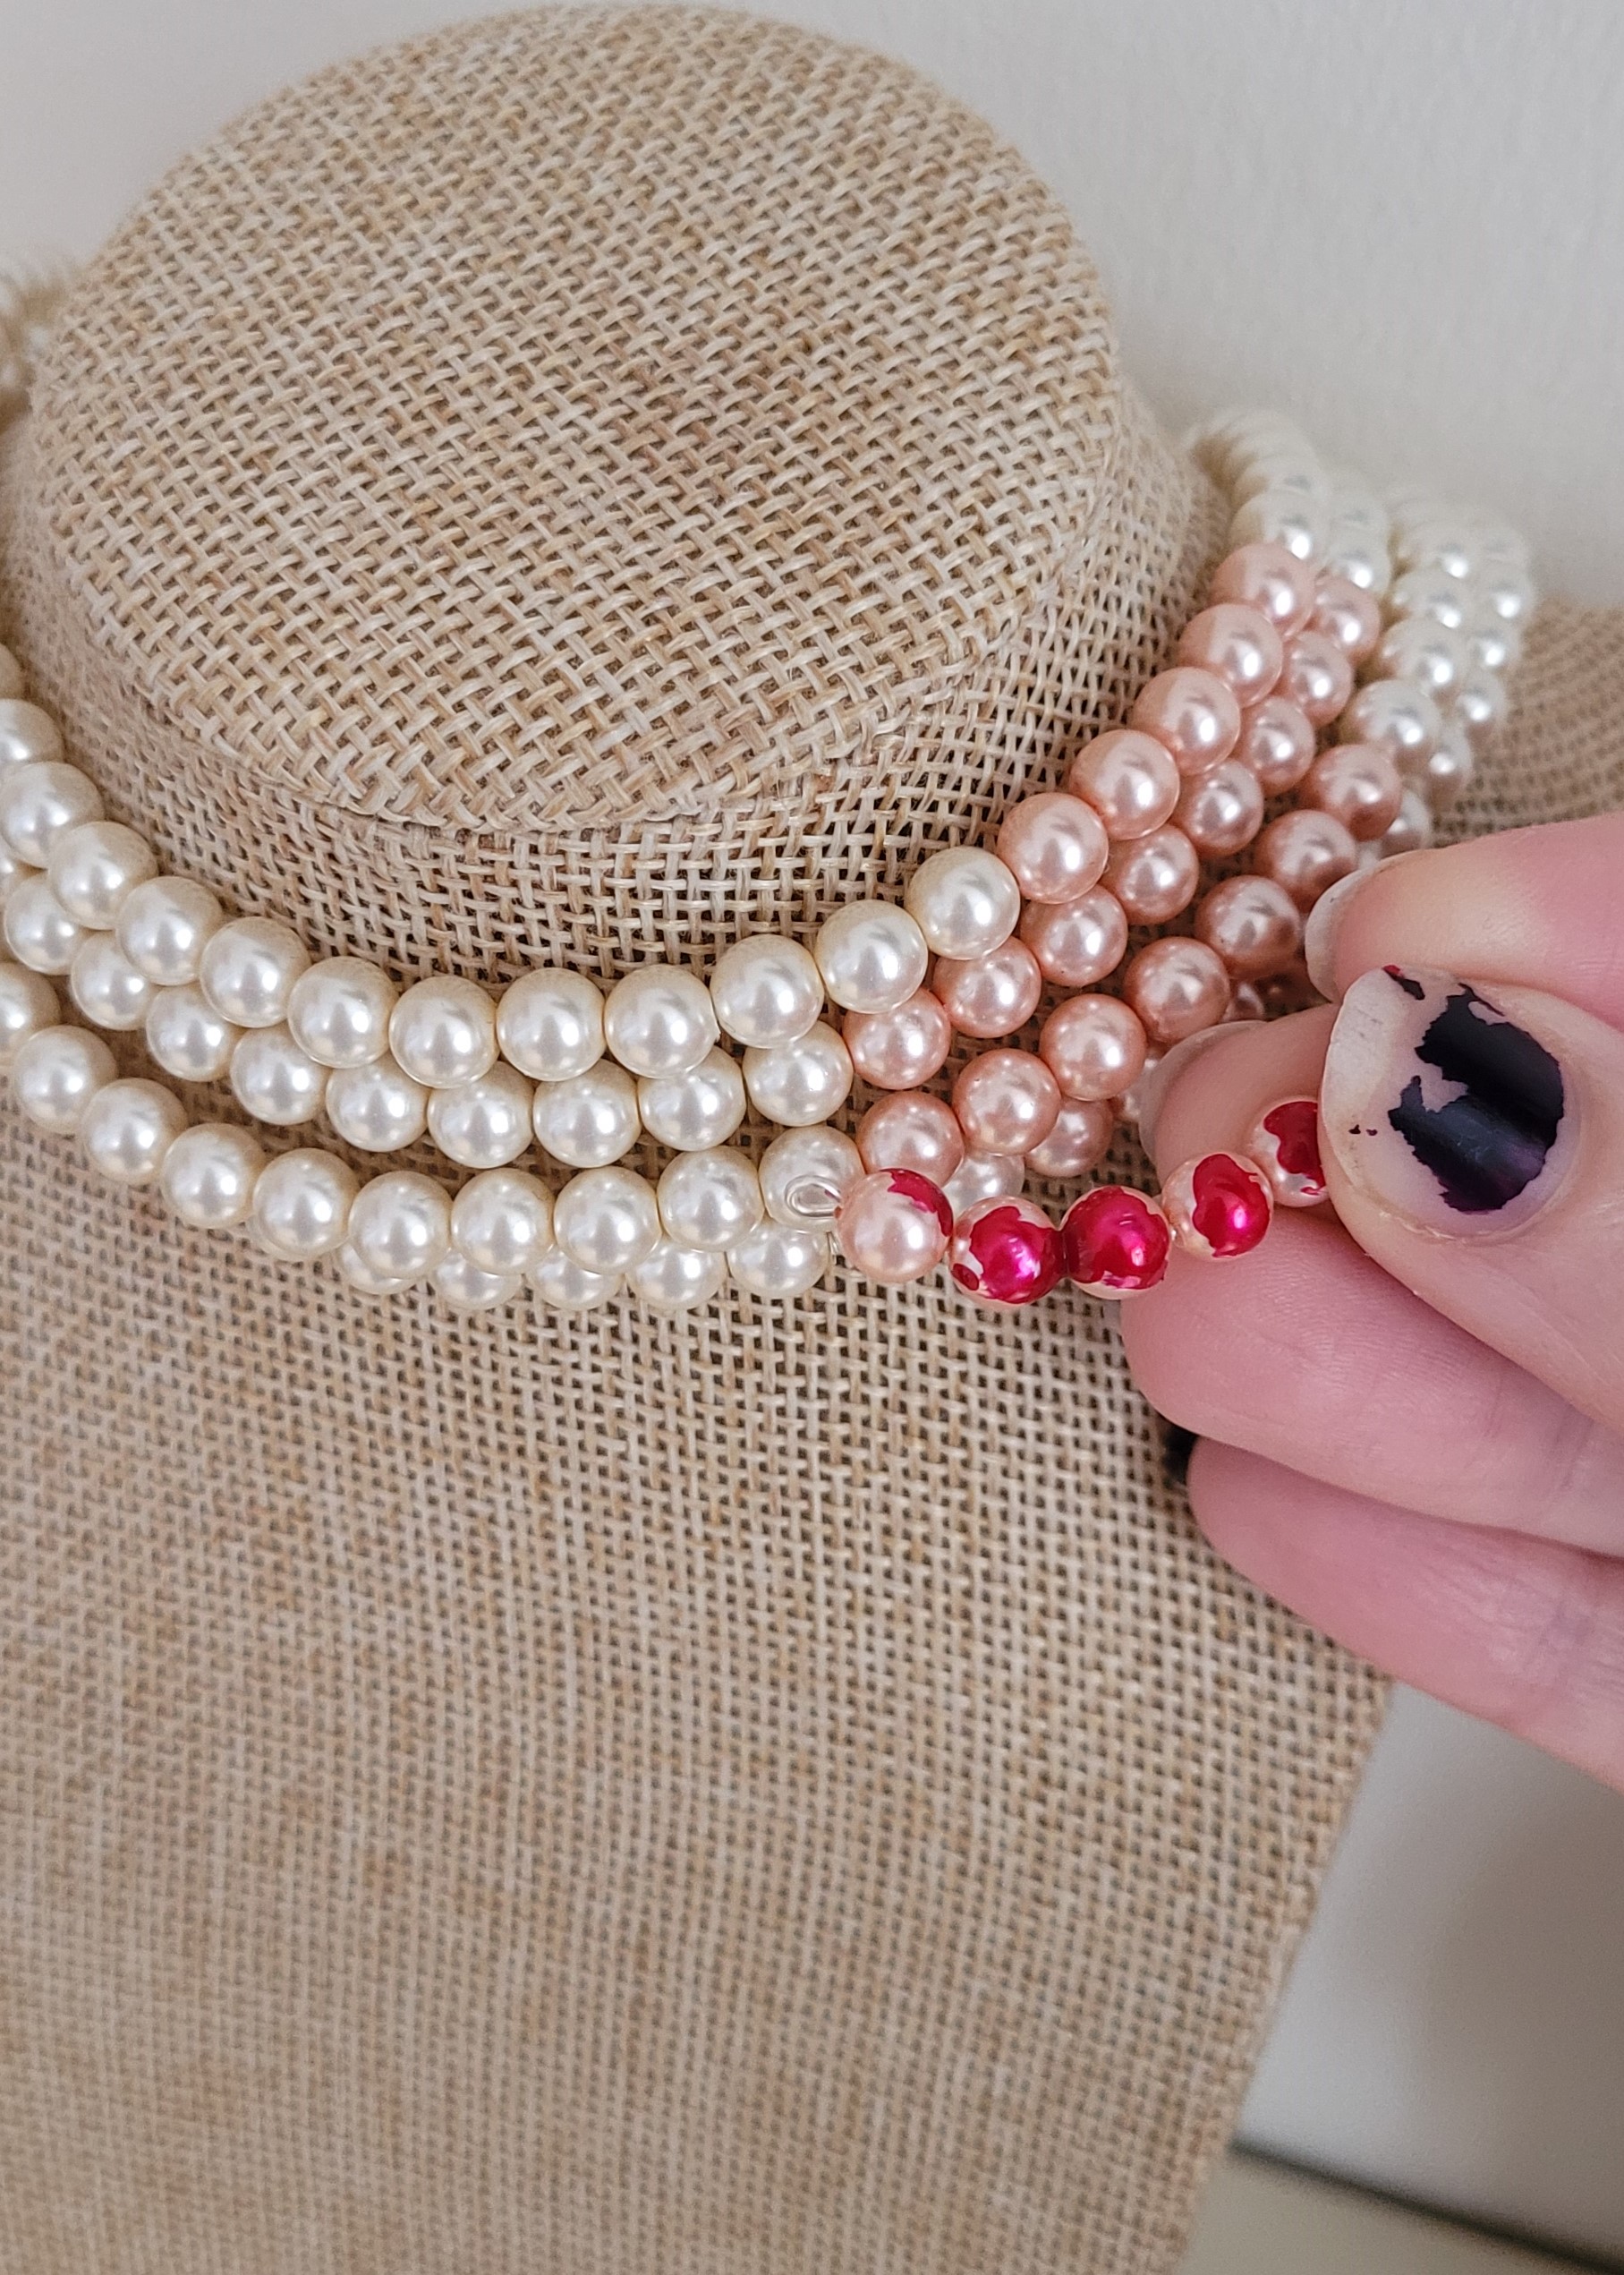
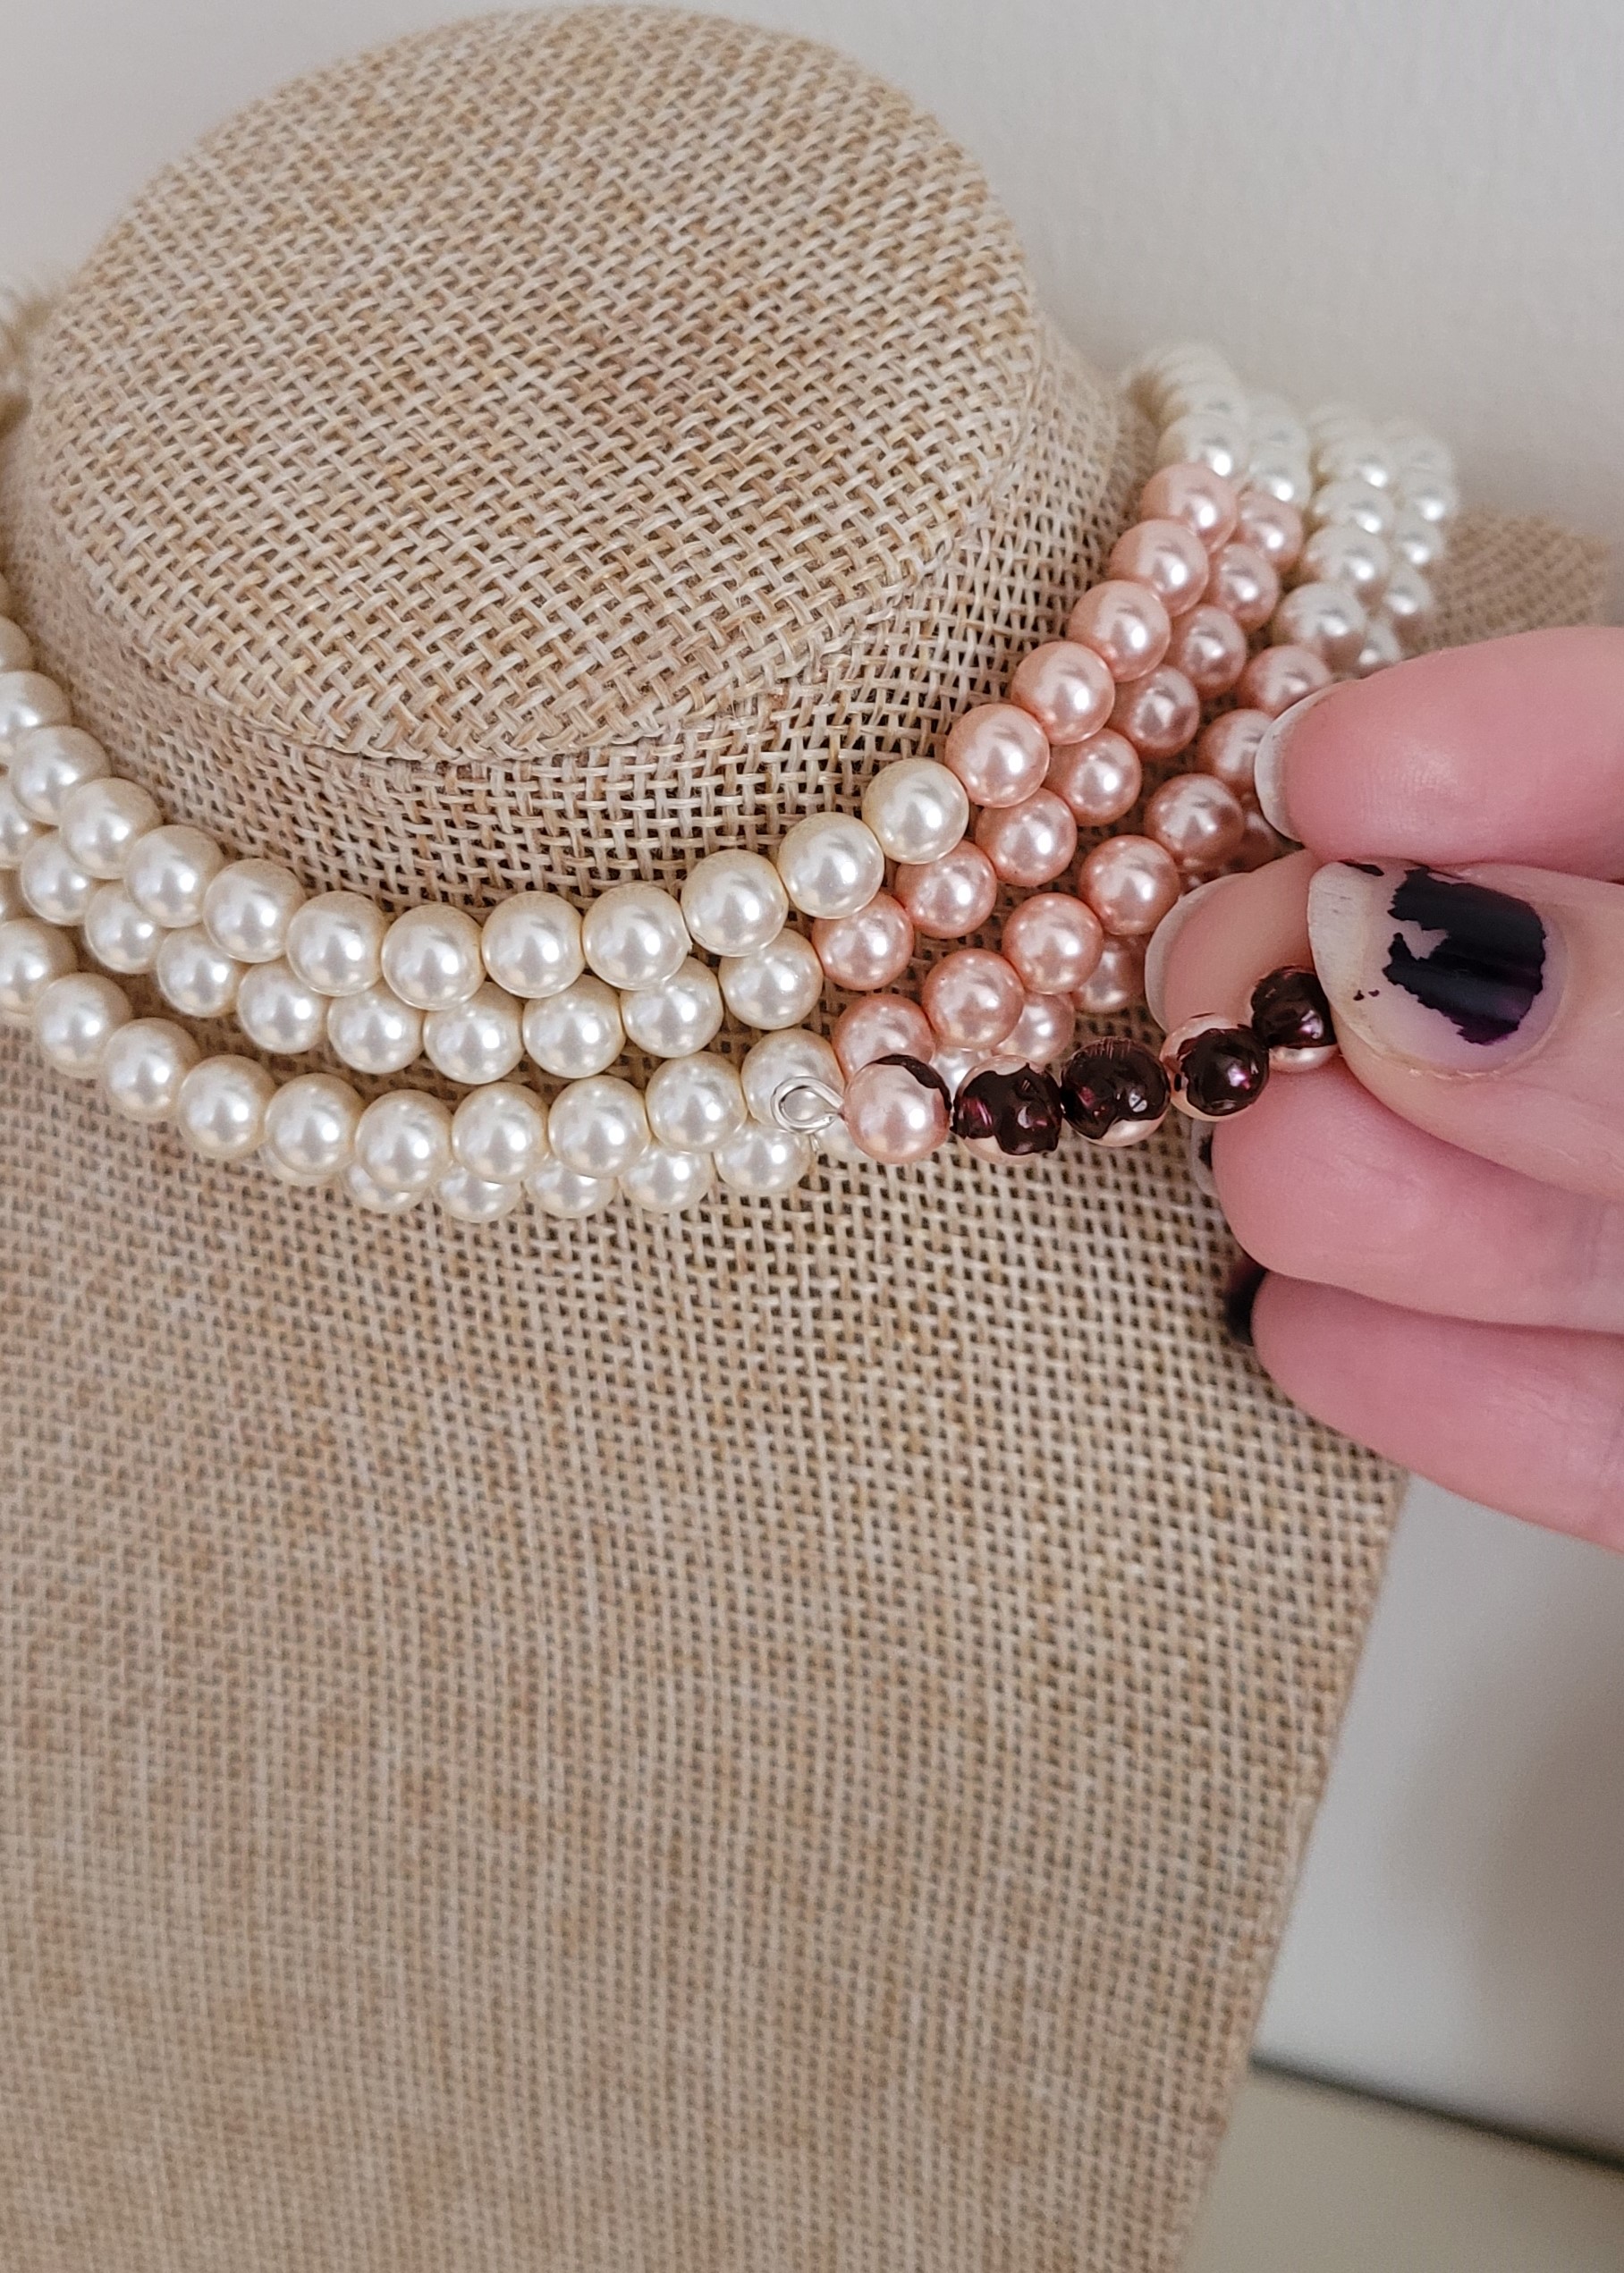
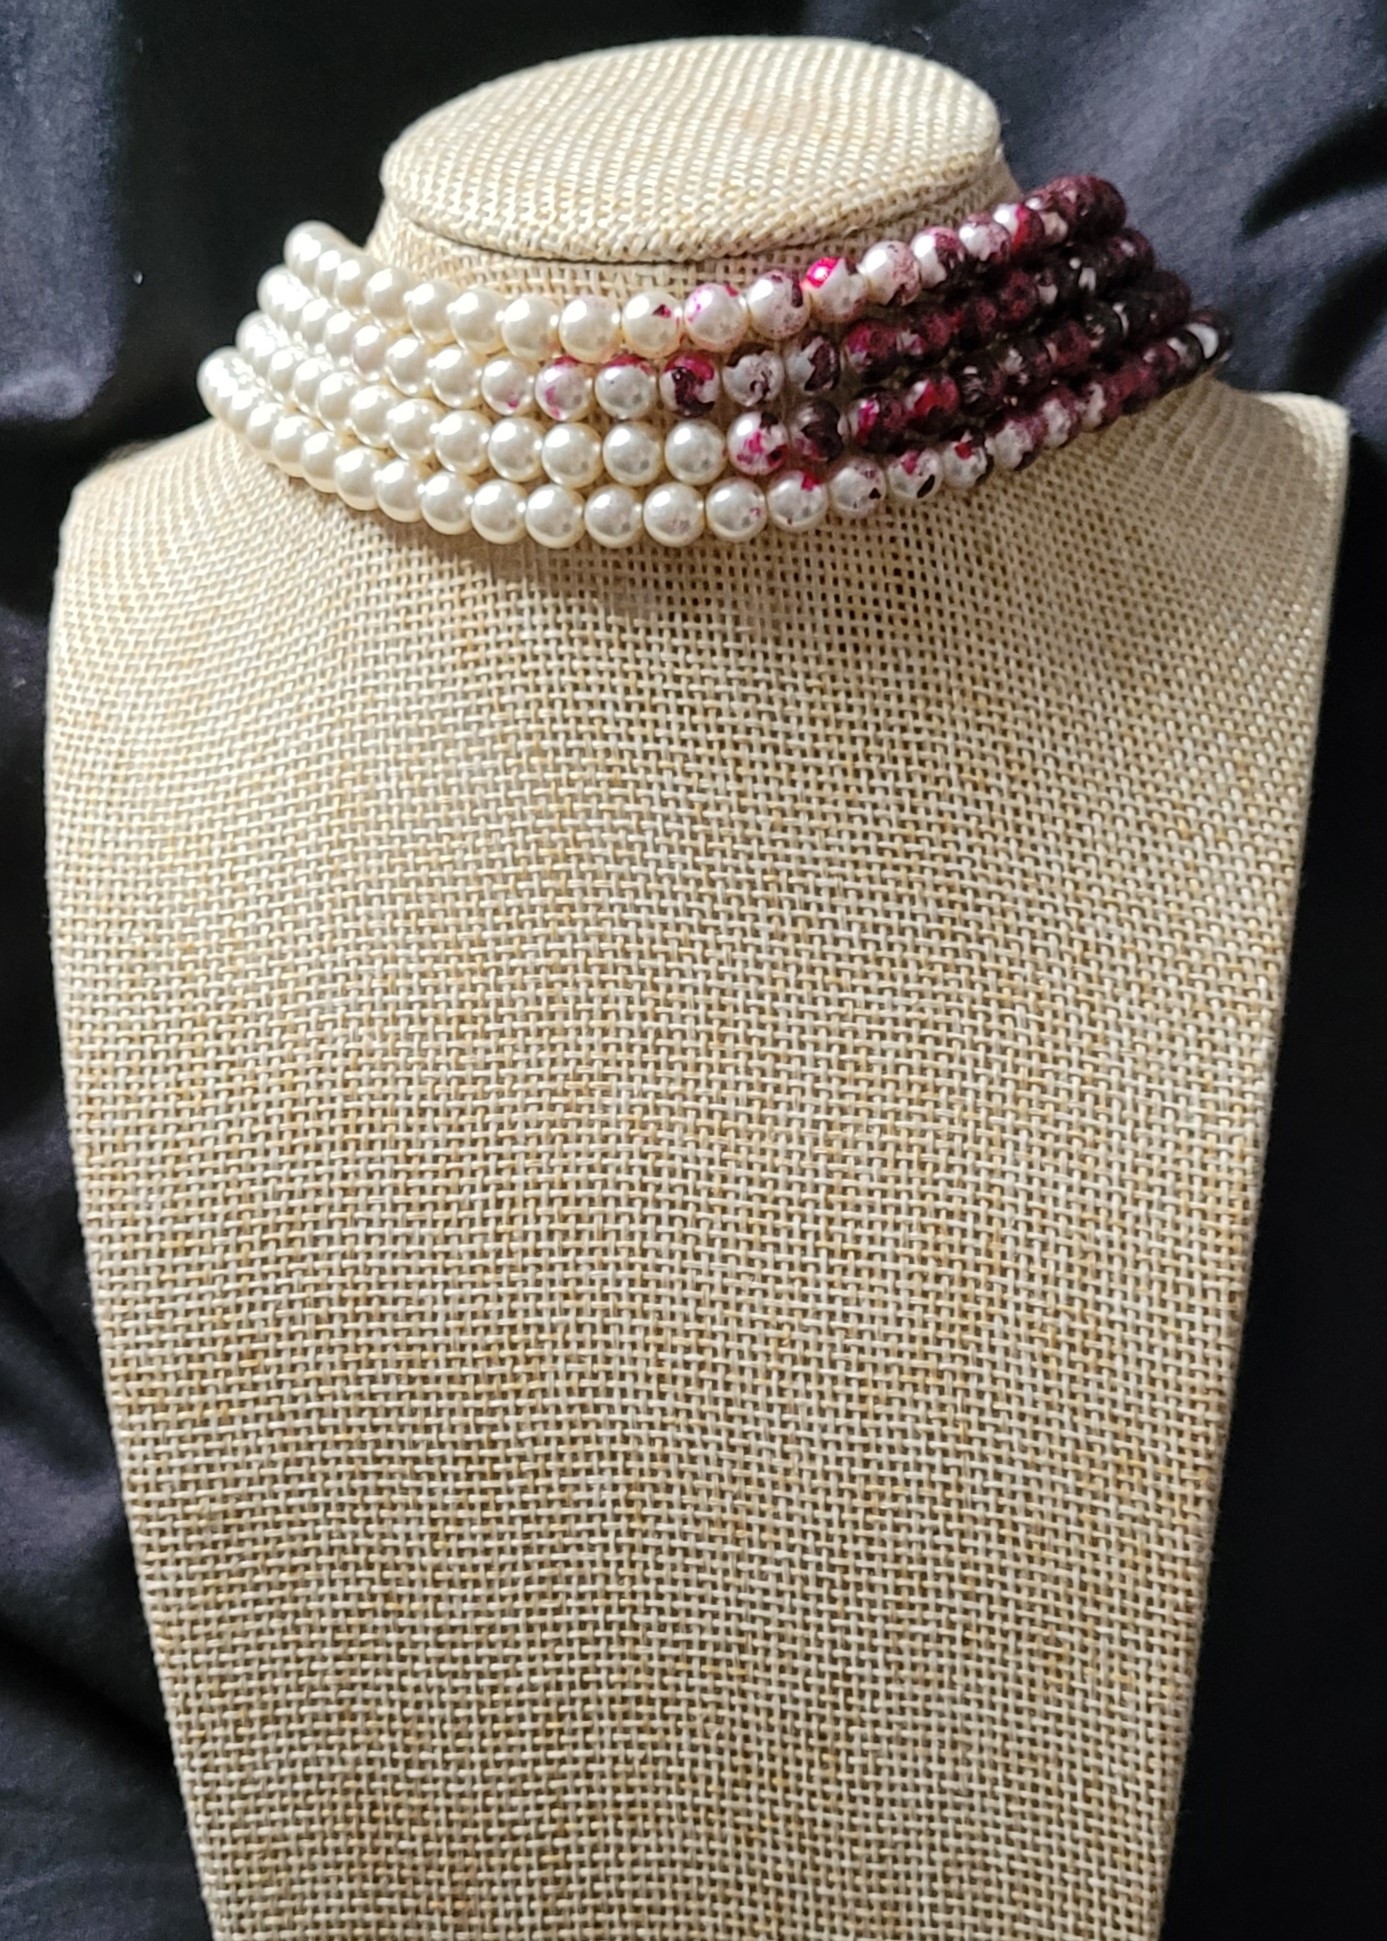
Right, today, I want to show you how I got on with adding the “blood splatter” to the pearls. But ahead of that, here’s a quick ‘Before’ shot, side by side with the Hell’s Belle Designs version of a Dior piece that I’m taking inspiration from:
I had a few ideas about what I could use to achieve the appearance of smeared blood: resin, acrylic paint, and nail polish. It needs to look “bloody”, but at the same time, quite obvious that it’s not real. So I decided to test each… substance? Liquid? Liquid. Feels weird calling them all liquids, although that’s what they are.
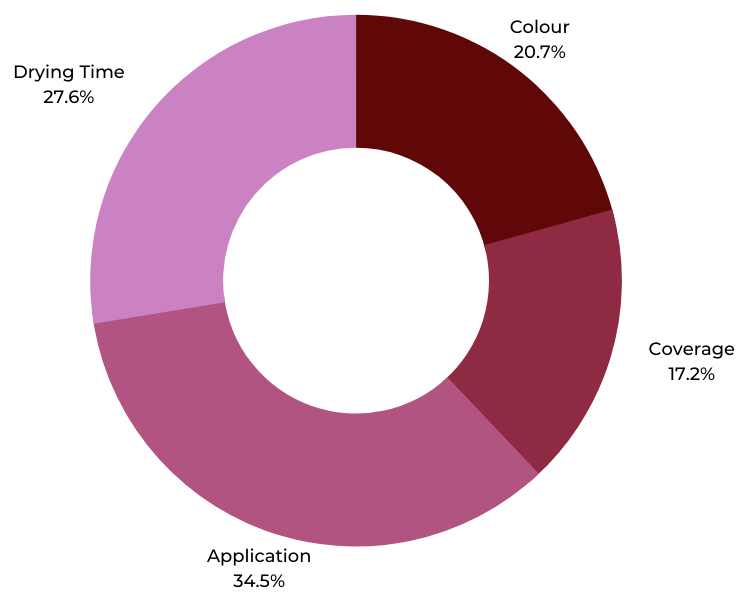
Time not being my best friend at the moment, I had to test them all on different days. So, to keep it all as fair as possible, I made sure to do everything in the same room, at around the same time of day, making the most of the natural light and available workspace. And I decided I would score each on Colour, Coverage, Application and Drying Time. There will be a little bit of maths involved for that bit, which means I got to spend a long time messing about with the colours on the little pie charts I made on Canva! Yes, pie charts. There are pie charts in my blog now.
But before we can look at the numbers, it’s going to get a bit sciencey.
I’ve written a few scientific reports before, and considered setting this out as though it was one, complete with an abstract and a discussion; even a reference list. But the more time I spend faffing about typing, the less I will have to get on with completing the choker in time for Hallowe’en. Plus, it’s not really that amusing an idea. And on a personal note, the sight of another journal or article honestly would make me want to weep right now.
To start, I dug out a few more of the pinky pearls I’d used to “fix” my choker last week, and threaded them in groups of 5, onto silver coloured wire, so they would be less tricky to handle. Though I want to stay away from this being like a scientific report, I probably should have made a 4th group kept bare as a control to compare the others against. But I suppose the choker itself is the control group. Hmm. Anyway…
So, the trials began on Tuesday, after I came home from the shops with bits for that evening’s dinner, a deep red nail polish… and a 4 pack of toffee apple muffins and press-on holographic glitter nails.
TUESDAY – 12.10.2021
Trial No.1 – Nail Polish
I did actually need the red nail polish – way more than the press-ons and the muffins, believe it or not – because closest I already had was a bright, summery coral-ish tone which, while gorgeous, isn’t exactly what I’m looking for here. And I’ve had it for a while, so it is getting a bit gloopy and streaky.
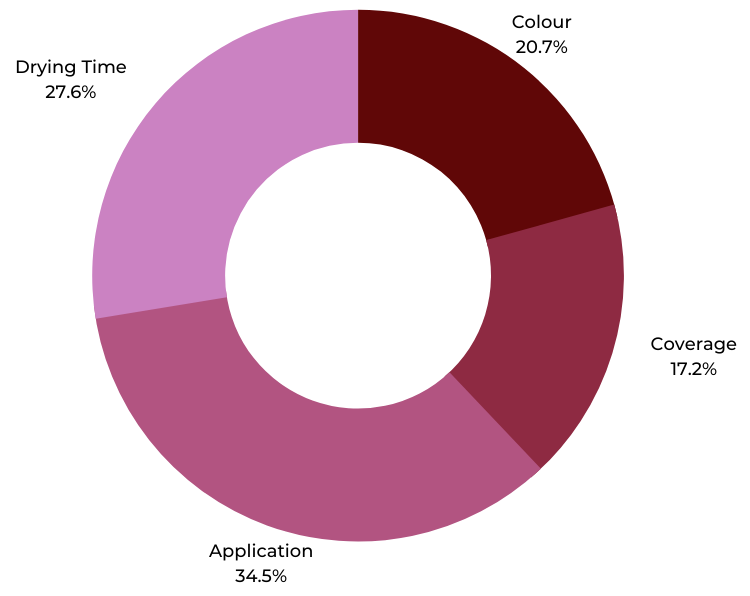
Colour
The shade is called Crimson, from W7. In the bottle, it’s a deep red with a lot of warmth to it. Like I expect crimson to look, funnily enough. Opening the bottle, though, the colour has more of a pinky tone. Bit more of a cooler red. Which was really enhanced by the pearls, and in turn, it really brought out their glow. But still, is she bloody enough? Not really. 6/10
Coverage
I swiped on about two coats’ worth, and the result was still quite translucent. Or “buildable”, as they’d probably say in the cosmetics industry. Buildable. It’s not a bug, it’s a feature! 5/10
Application
It being brand new, and having its own brush really helps it, obviously. It was easy enough to swipe and smear over the pearls; very smooth, easy application. 10/10
Drying Time
A few minutes? I don’t know, actually. I forgot to pay much attention. There’s nothing on the bottle to suggest it’s a quick-dry formula. But I was able to touch the pearls without ruining them pretty soon after painting, anyway. 8/10 (and a 2/10 for my lack of attention. This will not be added to its final score)
Final Score
29/40
WEDNESDAY – 13.10.021
Trial No.2 – Acrylic Paint
I mixed some red acrylic paint with a smidgen of black and an even smaller smidge of brown (and then later, blue!). It’s quite thick, so it’s got good smearability, but not so gloopy that it will take ages to dry. And of course, washing it off the brush, my hands, and my silicone mat was nice and easy.
Colour
It looked a fair bit like old, dried blood. Even before it had actually dried. I need to reacquaint myself with the difference between shades and tones, I think. When it did dry, on camera it looked almost black, but in real life, natural light, it looked like I’d smeared chocolate on it. 4/10
Coverage
Opaque. Just as I liked the way the nail polish brought out the glow within the pearls, the opacity of this paint really smothered any light coming from them, and I thought that looked great too. The way I’d applied it: daubing it on any which way, added a slight sort of, grubbiness, that really suits the look of it. 10/10
Application
For old-ish paint, the colours mixed and went on quite smoothly with a paint brush. 7/10
Drying Time
Within about 15 minutes, it was pretty much all touch dry and safe enough to faff about with. I would’ve preferred it to have dried quicker, because I was a bit pressed for time, but I can’t exactly blame paint for that. 5/10
Final Score
26/40
Because I absolutely cannot work out how to focus on just one project at a time, I want to interrupt this post to quickly tell you about something else I’m currently working on: I’m putting some kits together, of mix and match BFF earring and necklace sets. I say “BFF”, but you could just as easily share them with siblings or parents or whoever. You could even keep the full sets for yourself; I wouldn’t be able to stop you!
How the idea came about was, I was shopping online for the red beads my choker needs, and got sidetracked by some gorgeous little precious metal heart charms. So I bought 12 of them. That shop saw me coming, didn’t they?
I’ll tell you more about them closer to when I make them available in my shop, because I want to save at least some information for that blog post. But I’m excited about my new idea and wanted to share. They’re so lovely! So, anyway, let’s now get back to these bloody pearls…
THURSDAY – 14.10.2021
Trial No.3 – Epoxy Resin
Well, it’s called Ecopoxy Resin, and it’s non-toxic, and uses bio-based epoxies. But the biggest immediate benefit to this over the usual epoxy resin, is that it doesn’t stink so you don’t really need to have all the windows open. Which is great, because it’s getting pretty cold outside now.
This, obviously, took the longest to set up and prepare.
Colour
In the beaker, looked a bit like raspberry jam. Not what I had in mind, but raspberry jam is my favourite kind of jam. Lifting some out with the stirring stick, and letting it run back down into the beaker, though, I could see how light-coloured and translucent it was. Not what I was after. 3/10
Coverage
It was so runny it barely did anything except migrate into the spaces between the pearls. Which it covered pretty well, to be fair. But I did need it to show up on the surface of the beads. 1/10
Application
I used an old makeup brush, which held the resin really well and probably would have made it easy enough to apply onto something that wasn’t small, smooth and spherical. For the potential there, I’ll give it an extra point or two. 4/10
Drying Time
I’m drafting this post about half an hour after clearing all of the resin paraphernalia away, and pouring what was left over into silicone pendant moulds. So far, it’s nowhere near even beginning to cure, and still fluid enough that I’ve been able to easily stir a needle around in it to get rid of some bubbles. I suppose it should be at least touch dry by this time tomorrow. By which time you should already be able to read this. Irrelevant/10
Final Score
8/40
I’d assumed, before I started, that resin would be The One. I’ve worked with it a fair bit lately, so was sure I knew how this would go. But nope! I didn’t even bother waiting until the curing stage before discounting it entirely.
Neither the nail polish nor the acrylic paint were perfect either, but they were far more easy and quick to work with. So, how will I choose which one to work with? A reminder of the finals scores: 29 for nail polish, 26 for acrylic paint.
Nail polish wins then, right? Well, yes. But I went with both.
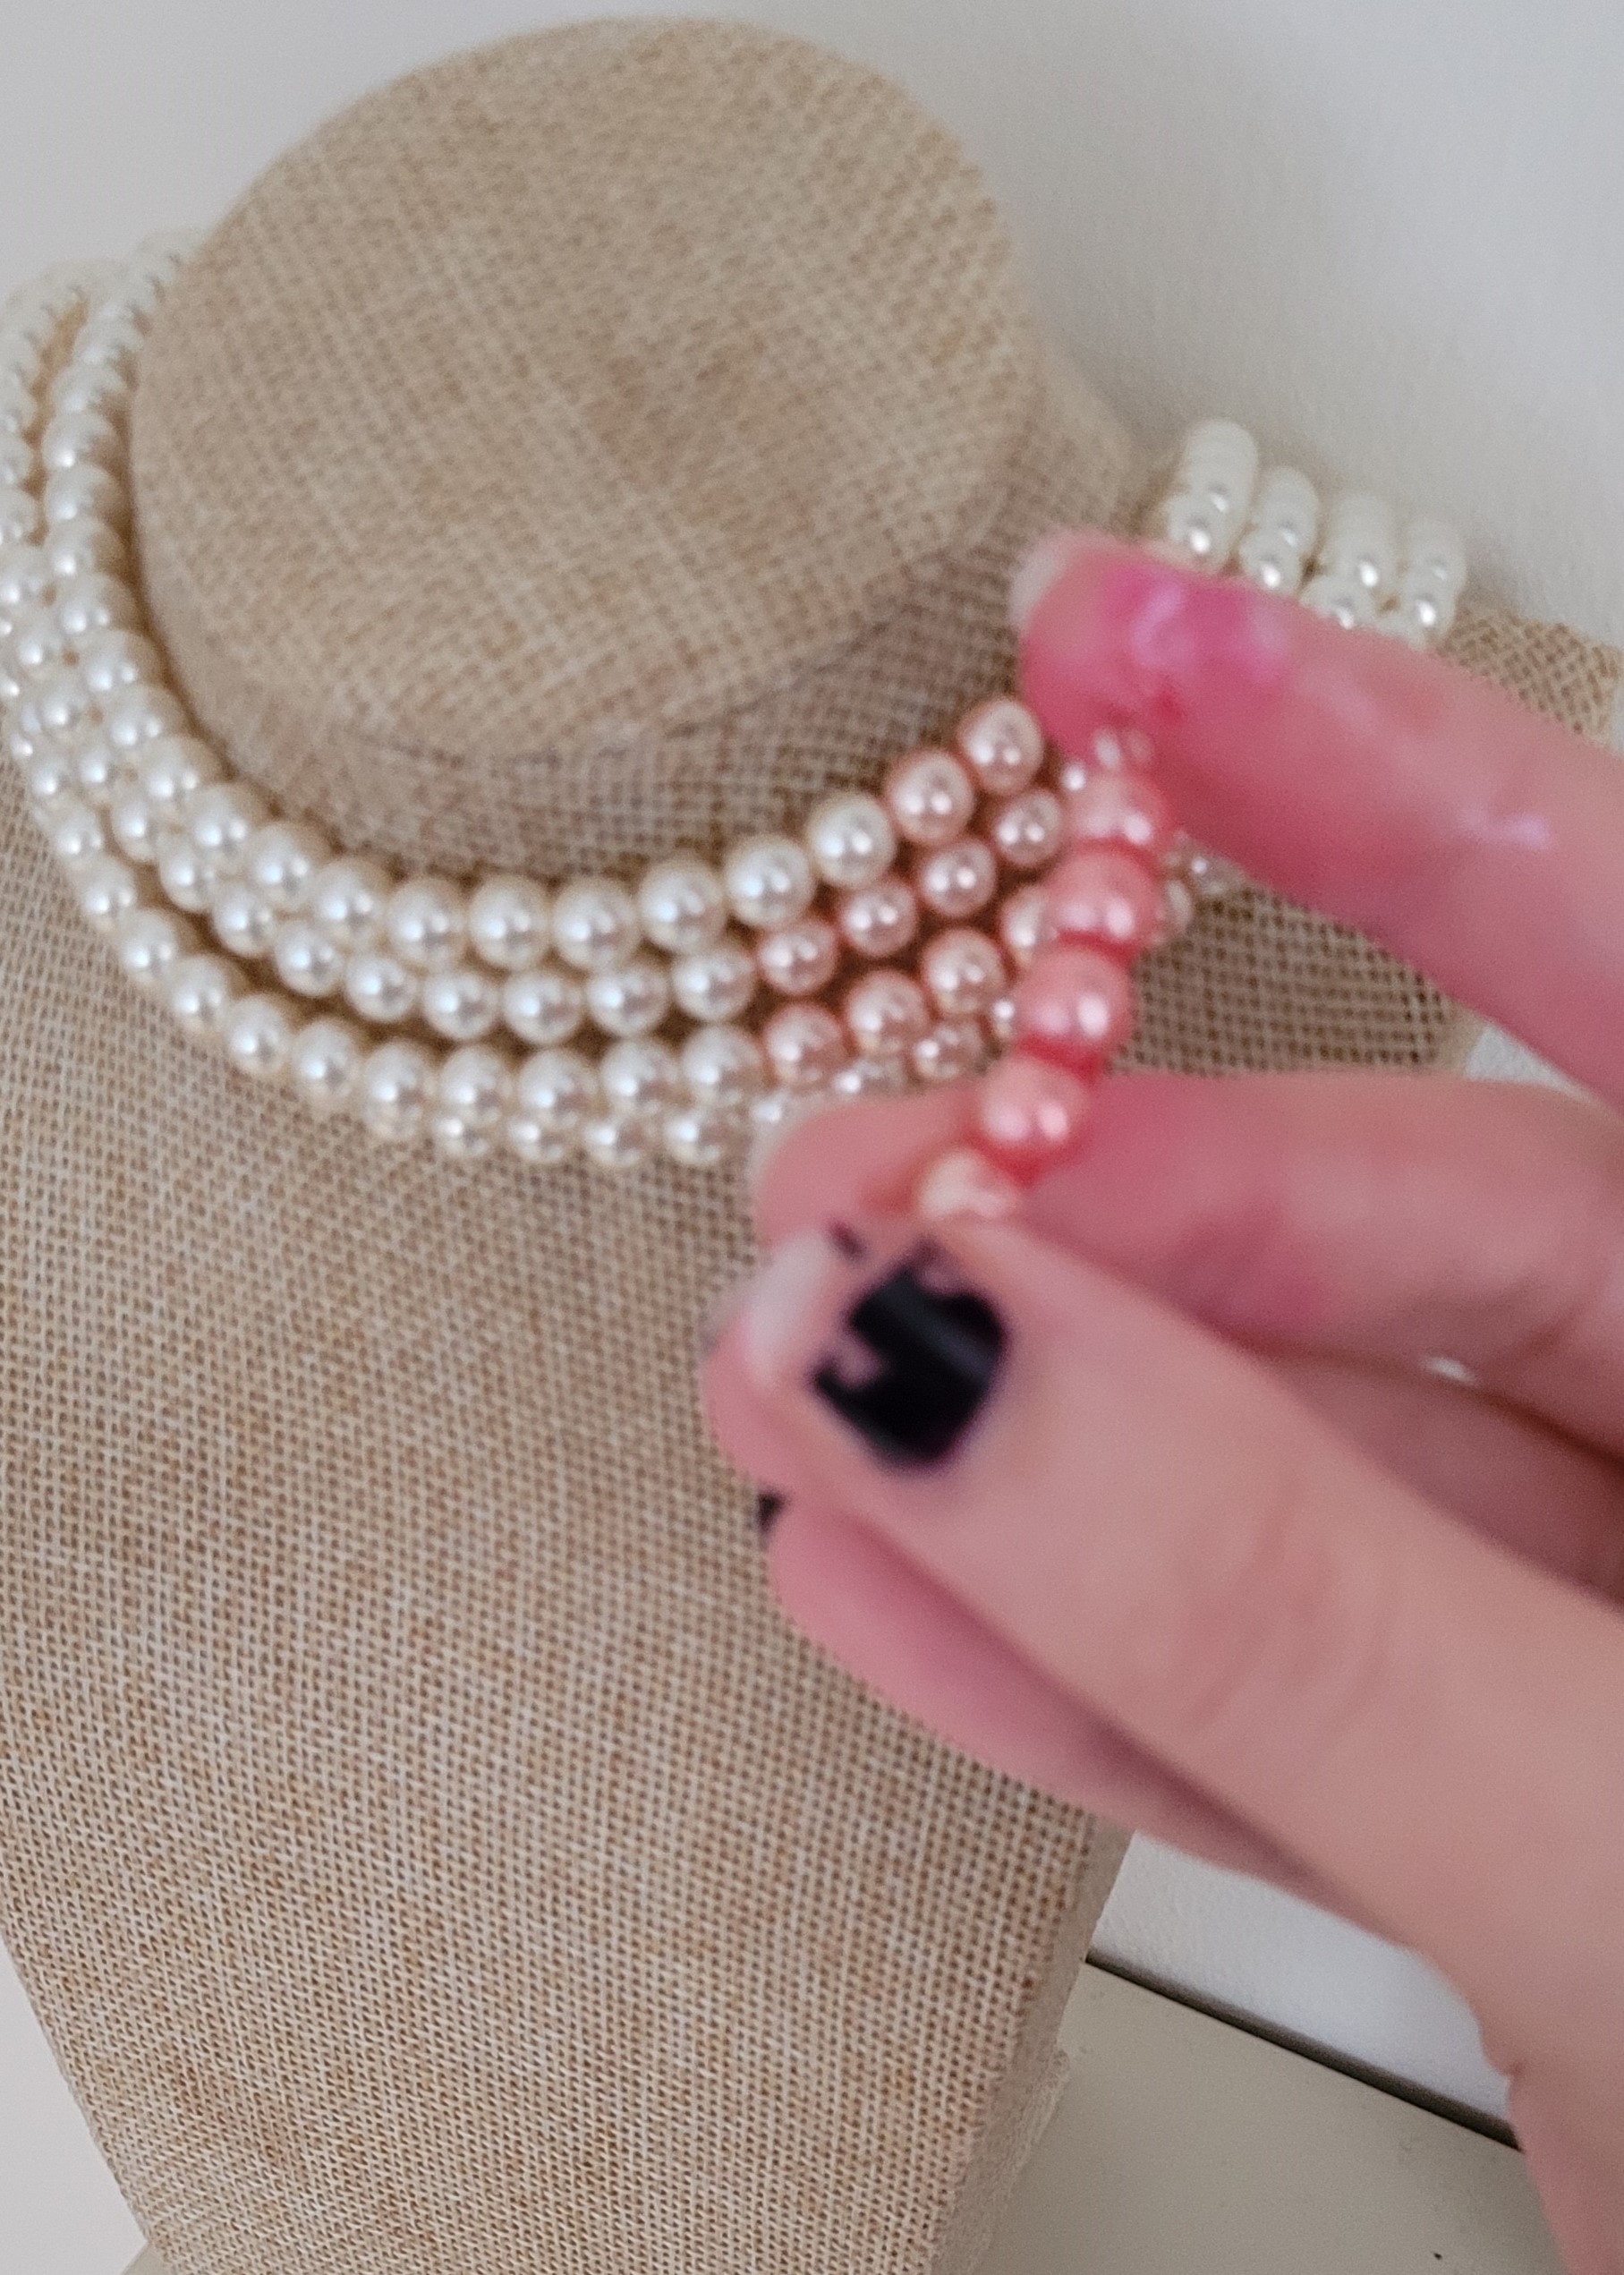
Earlier, I told a bit of an unintentional fib when I said the only other red polish I had was coral. Turns out I do have one other: it’s red glitter. So red and so glittery, that it’s called Ruby Slippers. How could I not use that?
I’m really pleased with how it’s going so far. And again, I almost want to leave it as it is. And I could, really. It’s my project, after all. But I bought all those lovely red beads and it would be a shame not to use them.
I always have all these ideas for things to create, floating around my mind, that I would love to see in front of my eyes, but I’m terrible at translating the image in my head onto paper, to make a physical plan of exactly what I should be doing. So I just have to wait until I get the chance to make the actual, physical, thing. Most of the time, it works out pretty well. And I’m hoping the drippy beads situation, the next stage of this project, will be one of those times, too.
And that is what I will be covering in the next part of this series, which I’m aiming to get posted on 22 October.
So if you want to see how that turns out, be sure to give this blog a follow so you don’t miss it.
That’s all for now. Thanks so much for popping in and having a read. Have a lovely rest of your day!
There’s lots more to come as this project develops, and while I work out a more consistent schedule for this blog, so please subscribe if you don’t want to miss future posts. And of course, likes and comments are muchly appreciated.
If you’d like to see more from me, you can find me on Instagram (where you’ll find me most of the time), Twitter, and Facebook, and of course, you cantreat yourself and visit my Shop!
Something that helps me to relax is sorting out the various bits and bobs in my jewellery making stash. The neat and tidy end result – seeing all the findings, wires and beads in their little stacking pots – is about as satisfying as putting all the jumbled bits into little groups.
It also gives me the chance to think of new design ideas. One of the few times I’m not doing something else completely unrelated when inspiration strikes, and can actually get started on it right then and there.
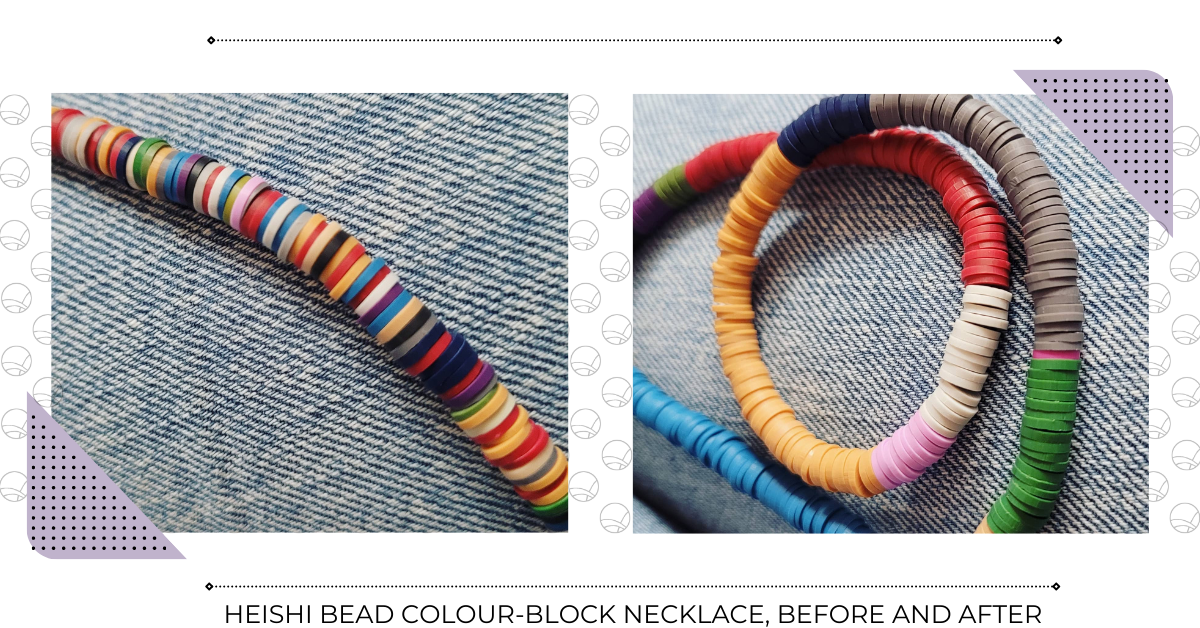
The last lot of beads I added to my ever-growing stash were some lovely strands of heishi beads, made from polymer clay. I bought them rather than making them myself, as polymer clay is something I’m yet to work with. Maybe I’ll get round to that one day; it looks quite versatile, and it would be a great excuse to buy new tools!
I was surprised at how light and bendy the beads are. Well, I say ‘bendy’; you couldn’t exactly roll or scrunch them up and expect them to return to normal, but being clay I assumed they would be quite delicate and brittle, especially in these thin disc shapes. But there’s definitely a bit of give in them. That explains the ‘polymer’ in ‘polymer clay’, I suppose.
Anyway, some of the bead strands were solid colours, but my favourites had a whole mix. However, an idea I’d had in the back of my mind only needed a few of the colours, so I had to take those beads out to get working on it.
So, I removed the beads from the strand, and sifted through the pile to find the colours I wanted. And then I realise I wanted them all. They all looked so great together that I’m saving my original idea for later (and it’ll have to be much later, unfortunately; as I write up this blog post, I realise I’ve forgotten what the original idea even was! Whoops!), and this will now be a colour block necklace. So I carried on until all the colours were separated, and threaded them back onto a length of beading thread, securing the ends ready for a clasp to finish it all off.
Now I have brand new, colourful necklace to wear! And all it took was a willingness to sit patiently for a few hours, hunched over a pile of literally hundreds of tiny discs, making sure I’d not confused about 4 different shades of off-white for any other. I had. And I was almost halfway through re-stranding when I noticed. But it’s not weird that I’d happily do it all again though, right? Right?
That’s all for now. Thanks so much for popping in and having a read. Have a lovely rest of your day!
This blog is still very new so there’s lots more to come as I work out a more consistent schedule. Feel free to subscribe so you don’t miss future posts. And of course, likes and comments are muchly appreciated.
If you’d like to see more from me, you can find me on Instagram, Twitter, and Facebook, and of course, you can support me and treat yourself in my Shop!